TapSDK Integration
This document introduces how to quickly integrate TapSDK.
Environment Requirements
- Unity
- Android Java
- Android Kotlin
- iOS Swift
- iOS Objective-C
- Unity 2019.4 or higher
- iOS 11 or higher, Xcode version 15.3 or higher
- Android 5.0 (API level 21) or higher
- Android 5.0 (API level 21) or higher
- Android 5.0 (API level 21) or higher
- iOS 11 or higher, Xcode version 15.3 or higher
- Install UE 4.26 and above
- iOS 12 or higher
- Android 5.0 (API level 21) or higher
Supported Platforms: Android / iOS
Project Configuration
- Unity
- Android Java
- Android Kotlin
- iOS Swift
- iOS Objective-C
External Dependency Integration
The SDK internally uses some third-party libraries. Developers need to ensure that the external dependencies are properly integrated before using the SDK. The specific settings are as follows:
- The SDK uses the
Newtonsoft-jsonlibrary for JSON parsing. If this dependency is already integrated in the current project, no additional handling is needed. Otherwise, add the following dependency toPackages/manifest.json:
"com.unity.nuget.newtonsoft-json":"3.2.1"
- The SDK uses
com.google.external-dependency-managerto manage Android and iOS dependencies. If this dependency is already integrated in the current project, no additional handling is needed. Otherwise, add the following dependency toPackages/manifest.json:
{
   "dependencies": {
      "com.google.external-dependency-manager": "1.2.179"
   },
   "scopedRegistries": [
      {
         "name": "package.openupm.com",
         "url": "https://package.openupm.com",
         "scopes": [
            "com.google.external-dependency-manager"
         ]
      }
  ]
}
Adding SDK Dependencies
The SDK supports integration through Unity Package Manager and local file imports. Developers can choose one of these methods based on their needs, with remote dependencies being recommended.
Remote Dependency
The SDK can be integrated via NPMJS or GitHub. Developers can choose one of these methods.
1. NPMJS Integration
Add the following dependencies in the project's Packages/manifest.json file:
"dependencies":{
  "com.taptap.sdk.core":"4.5.4",
}
Note that you need to declare scopedRegistries at the same level as dependencies in Packages/manifest.json:
"scopedRegistries":[
  {
    "name": "NPMJS",
    "url": "https://registry.npmjs.org/",
    "scopes": ["com.taptap"]
  }
]
2. GitHub Integration
Add the following dependencies in the project's Packages/manifest.json file:
"dependencies":{
 "com.taptap.sdk.core":"https://github.com/taptap/TapSDKCore-Unity.git#4.5.4",
}
In Unity's top menu, select Window > Package Manager to view packages installed in the project.
Local File Import
- Download the corresponding
unitypackagefiles for the modules from the Download Page and import them into the Unity project through Assets > Import Packages > Custom Packages, including:
TapSDK_Core.unitypackageTapTapSDK Core Module, Mandatory。
- If the current project has already integrated the
Newtonsoft.Jsondependency, skip this step. Otherwise, download the library file fromNuGet.orgNewtonsoft.Json by clicking "Download package" on the right, change the file extension from.nupkgto.zip, extract the file, and copy theNewtonsoft.Json.dllfile to thePluginsdirectory underAssets. Additionally, to avoid deleting necessary data when exporting to the IL2CPP platform, create alink.xmlfile in theAssetsdirectory (if it already exists, add the following content):
<linker>
  <assembly fullname="System.Core">
    <type fullname="System.Linq.Expressions.Interpreter.LightLambda" preserve="all" />
  </assembly>
</linker>
- Add the repository address to the build.gradle in the root directory of the project:
allprojects {
  repositories {
      google()
      mavenCentral()
  }
}
- Add corresponding module dependencies to the app module's build.gradle (e.g., login and embedded dynamics):
dependencies {
  implementation 'com.taptap.sdk:tap-core:4.5.4'
}
- Add network permissions in
AndroidManifest.xml:
<uses-permission android:name="android.permission.INTERNET"></uses-permission>
-
Additional configuration for older Android versions
If
targetSdkVersion < 29, you also need to add the following configuration:- Add
xmlns:tools="http://schemas.android.com/tools"to themanifestnode - Add
tools:remove="android:requestLegacyExternalStorage"to theapplicationnode
- Add
Import SDK
iOS provides two integration methods: adding CocoaPods remote dependencies and using local file imports. It is recommended to use the remote dependency method.
Remote Dependencies
- Add dependencies under the corresponding module in the project's Podfile file:
pod 'TapTapCoreSDK', '~> 4.5.4'
- Execute
Pod installto download the corresponding dependency files
Local File Dependencies
- Download the following files from the Download Page:
tapsdkcorecpp.xcframeworkBase LibraryTapTapBasicToolsSDK.xcframeworkBase LibraryTapTapCoreSDK.xcframeworkCore LibraryTapTapGidSDK.xcframeworkBase LibraryTapTapNetworkSDK.xcframeworkBase LibraryTHEMISLite.xcframeworkBase Library
- Add the
frameworkstatic library to the project, ensure the Embed method is set to Do Not Embed - The SDK internally uses the
Protobufdependency library. Developers should add the corresponding dependency in advance through remote or file import methods.
Configure Compilation Options
-
Add
-ObjCto Other Link Flag in Build Setting. -
Set Always Embed Swift Standard Libraries to YES in Build Setting to always include the Swift standard library to avoid app startup errors like "Swift standard library not found". If not found in the project, create an empty Swift file, and Xcode will automatically establish a bridging relationship.
-
Choose Swift 5 in Swift Compiler - Language/Swift Language Version in Build Setting.
Initialization
When initializing TapSDK, you need to pass in application configuration information such as Client ID and region.
The new version of TapSDK provides unified initialization, and business modules (e.g., achievements, login, etc.) do not need separate initialization.
- Unity
- Android Java
- Android Kotlin
- iOS Swift
- iOS Objective-C
using TapSDK.Core;

// Core configuration
TapTapSdkOptions coreOptions = new TapTapSdkOptions
{
   // Client ID, obtained from the developer backend
   clientId = clientId,
   // Client Token, obtained from the developer backend
   clientToken = clientToken,
   // Region, CN for domestic, Overseas for abroad
   region = TapTapRegionType.Overseas,
   // Language, default is Auto, by default, zh_Hans for domestic, en for abroad
   preferredLanguage = TapTapLanguageType.zh_Hans,
   // Whether to enable logging, set to false for Release version
   enableLog = true
};
// TapSDK Initialization
TapTapSDK.Init(coreOptions);

// When you need to add initialization configuration items for other modules, such as compliance certification, achievements, etc., please use the following API
TapTapSdkBaseOptions[] otherOptions = new TapTapSdkBaseOptions[]
{
    // Other module configuration items
};
TapTapSDK.Init(coreOptions, otherOptions);
Please ensure that the initialization of TapSDK is executed on the main thread (UI thread).
import com.taptap.sdk.core.TapTapRegion;
import com.taptap.sdk.core.TapTapSdk;
import com.taptap.sdk.core.TapTapSdkOptions;

/* Required Configuration */
// Client ID corresponding to the Developer Center
String clientId = "";
// Client Token corresponding to the Developer Center
String clientToken = "";
// Whether to enable log, it is recommended to enable it during Debug and disable it during Release, default is to disable log
boolean enableLog = BuildConfig.DEBUG;

TapTapSdkOptions tapSdkOptions = new TapTapSdkOptions(
       clientId, // Game Client ID
       clientToken, // Game Client Token
       TapTapRegion.GLOBAL // Playable region of the game: [TapTapRegion.CN]=Domestic [TapTapRegion.GLOBAL]=Overseas
);
tapSdkOptions.setEnableLog(enableLog);
// Initialize TapSDK
TapTapSdk.init(context, tapSdkOptions);
Please ensure that the initialization of TapSDK is executed on the main thread (UI thread).
TapTapSdk.init(
    this,
    TapTapSdkOptions(
        clientId, // Game Client ID
        clientToken, // Game Client Token
        region, // Playable region of the game: [TapTapRegion.CN]=Domestic [TapTapRegion.GLOBAL]=Overseas
        channel, // Subpackage channel name
        gameVersion, // Game version number
        autoIAPEventEnabled, // Whether to automatically report GooglePlay in-app purchase success events, only effective for [TapTapRegion.GLOBAL]
        overrideBuiltInParameters, // Whether custom fields can override built-in fields
        properties, // Custom properties, these properties will be included when launching the first preset event (device_login)
        oaidCert, // OAID certificate, used for reporting OAID, only effective for [TapTapRegion.CN]
        enableLog, // Whether to enable log, it is recommended to enable it during Debug and disable it during Release, default is to disable log
        preferredLanguage, // TapSDK preferred language, default is TapTapLanguage.AUTO
    ),
    TapTapAchievementOptions(enableToast = true), // Achievement initialization configuration
    TapTapComplianceOptions(showSwitchAccount = true, useAgeRange = true) // Compliance certification initialization configuration
)
import TapTapCoreSDK

let options = TapTapSdkOptions()
options.clientId = "your_client_id" // Required, Client ID corresponding to the Developer Center
options.clientToken = "your_client_token" // Required, Client Token corresponding to the Developer Center
options.region = .overseas // .CN: Mainland China, .overseas: Other countries or regions
options.enableLog = true // Whether to enable log, it is recommended to enable it during Debug and disable it during Release, default is to disable log
options.preferredLanguage = TapLanguageType.auto // Language setting, default is to follow the system, when the system language is not supported, it defaults to Chinese domestically and English overseas

// Initialize SDK
TapTapSDK.initWith(options)

// When you need to add initialization configuration items for other modules, such as compliance certification, achievements, etc., you can call the following API
var otherOptions:[TapTapSdkBaseOptions] = []

// Add initialization configuration items for other modules
// otherOptions.append(moduleOptions) moduleOptions is the initialization configuration item for other modules

// Initialize SDK
TapTapSDK.initWith(options, otherOptions: otherOptions)
During initialization, you must fill in client_id and client_token
client_idandclient_tokeninformation can be found in Developer Center > Your Game > Game Services > Application Configuration.
Integration Features
TapSDK provides numerous features. After initializing the SDK, refer to the documentation of the corresponding features and integrate them as needed for your project. Most games will integrate TapTap login, so we recommend starting with this feature.
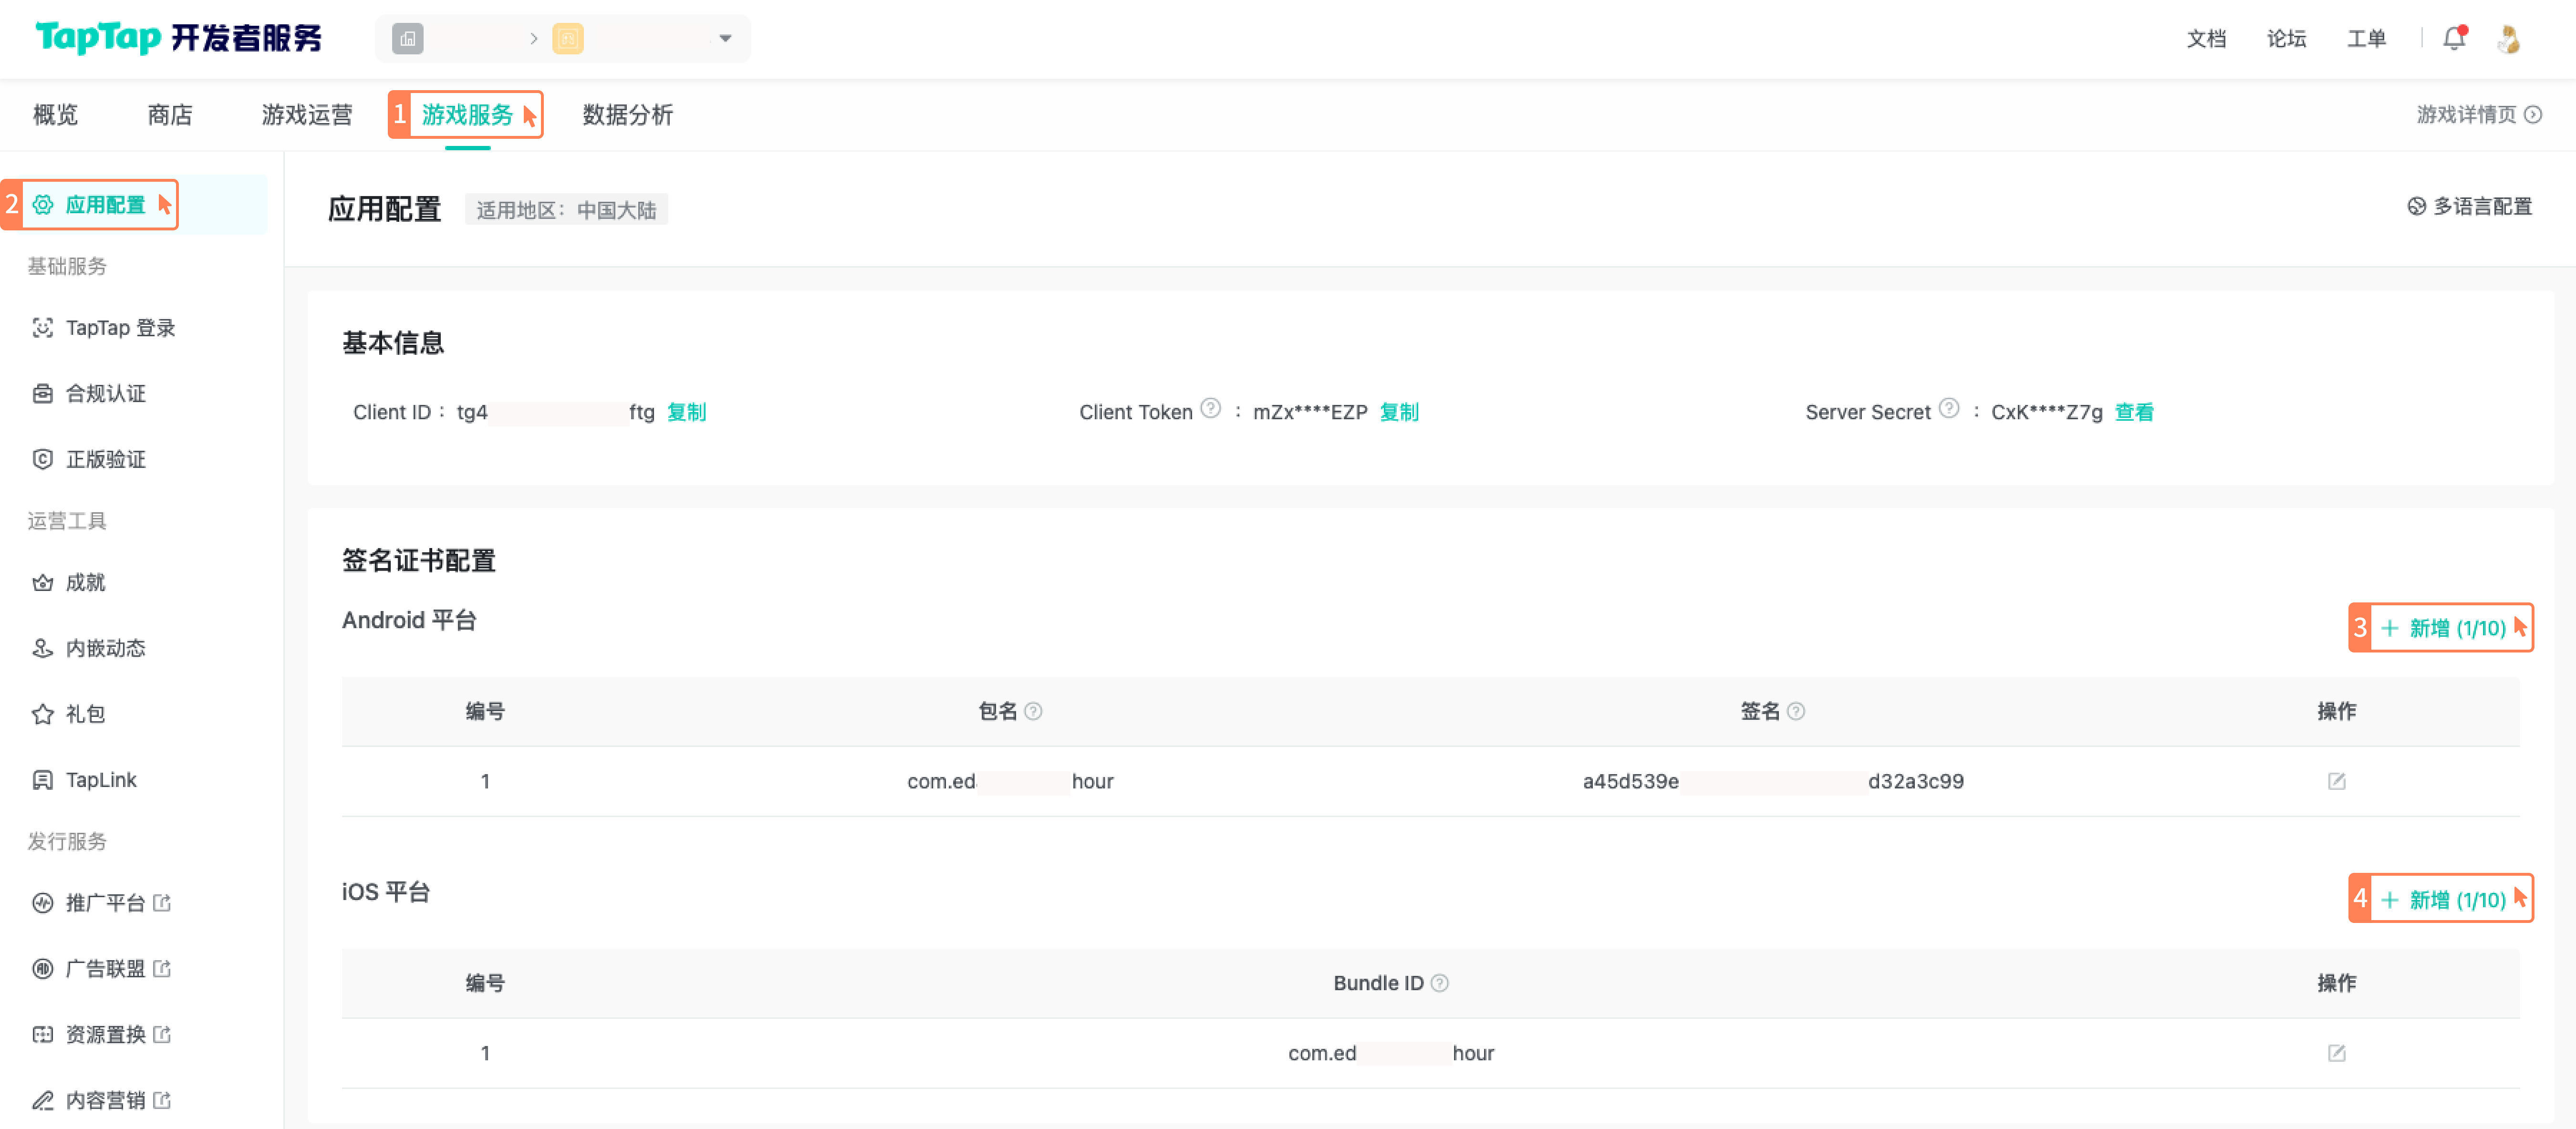
Configure Signature Certificate
Android and iOS applications need to go to the TapTap Developer Center, enter your game, and select Game Services > Application Configuration > Signature Certificate Configuration to configure the relevant information of the application (as shown below). Otherwise, when testing the login function for Android applications, a signature not match error message will be returned, and for iOS, a sdk_not_matched error message will be returned, making it impossible to use the TapTap login function normally.
Fill in the MD5 value at the Android signature. For details, please refer to: How to Obtain MD5 Value.
Next, you can package the application and test the TapTap login function.
Android Code Obfuscation
TapSDK has already been obfuscated, and further obfuscation will lead to unexpected errors. Please add the following configuration to your project's obfuscation script to skip the obfuscation operation on TapSDK:
-keep class com.taptap.**{*;}

-keep class com.tapsdk.**{*;}
Packaging
For Android or iOS, just follow the usual Android APK or iOS application packaging process. Here is an introduction to the Unity packaging process:
Packaging APK
Step 1, configure package name and signature file:
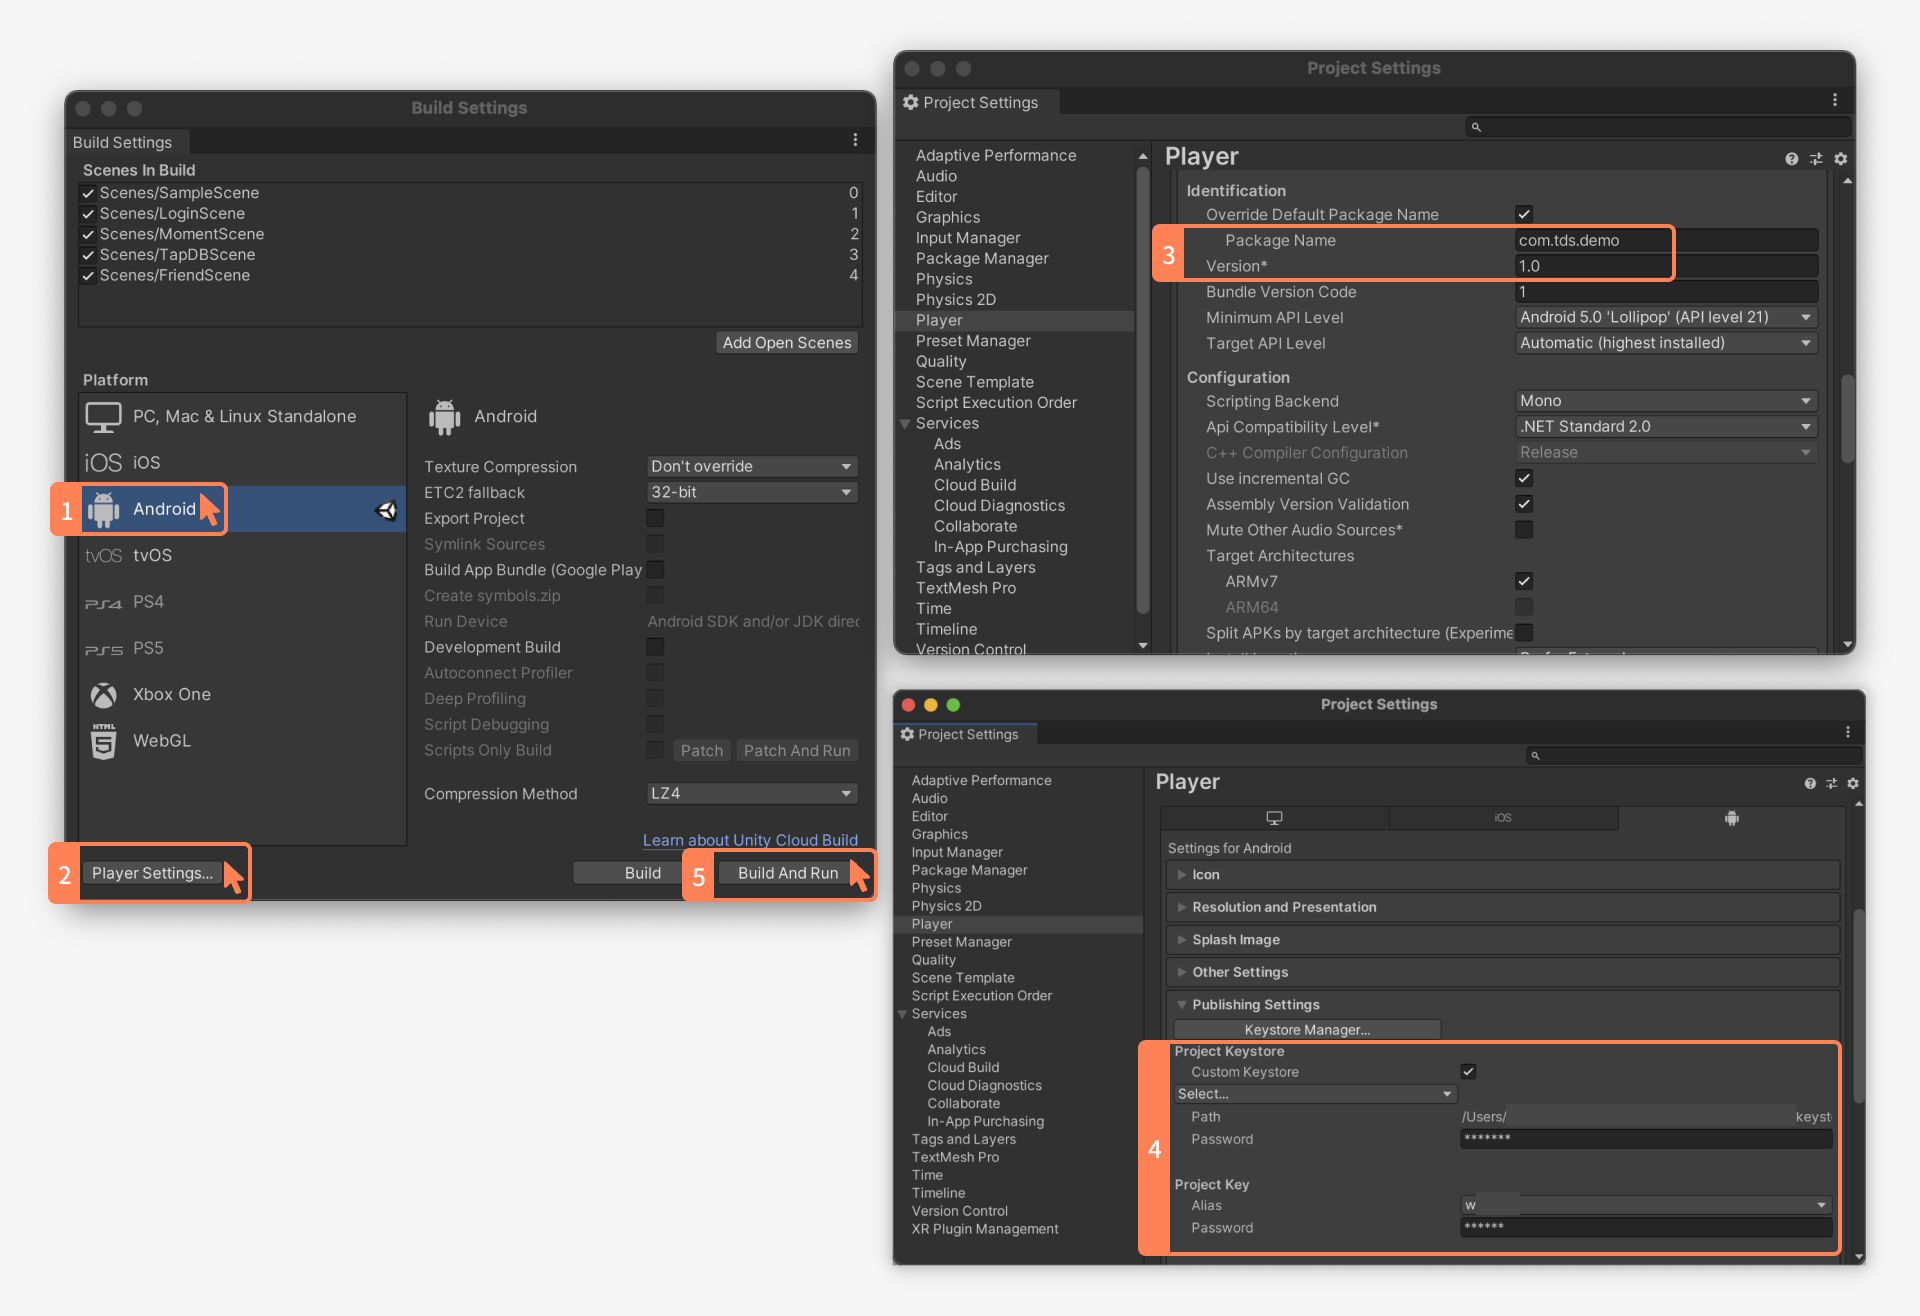
Step 2, check File > Build Settings > Player Settings > Other Settings > Target API Level version. When the API Level is less than 29, you need to configure the manifest and add in the application node:
tools:remove="android:requestLegacyExternalStorage"
This is because the SDK internally defaults to android:requestLegacyExternalStorage = true, which will cause an error Android resource linking failed when targetSdkVersion < 29.
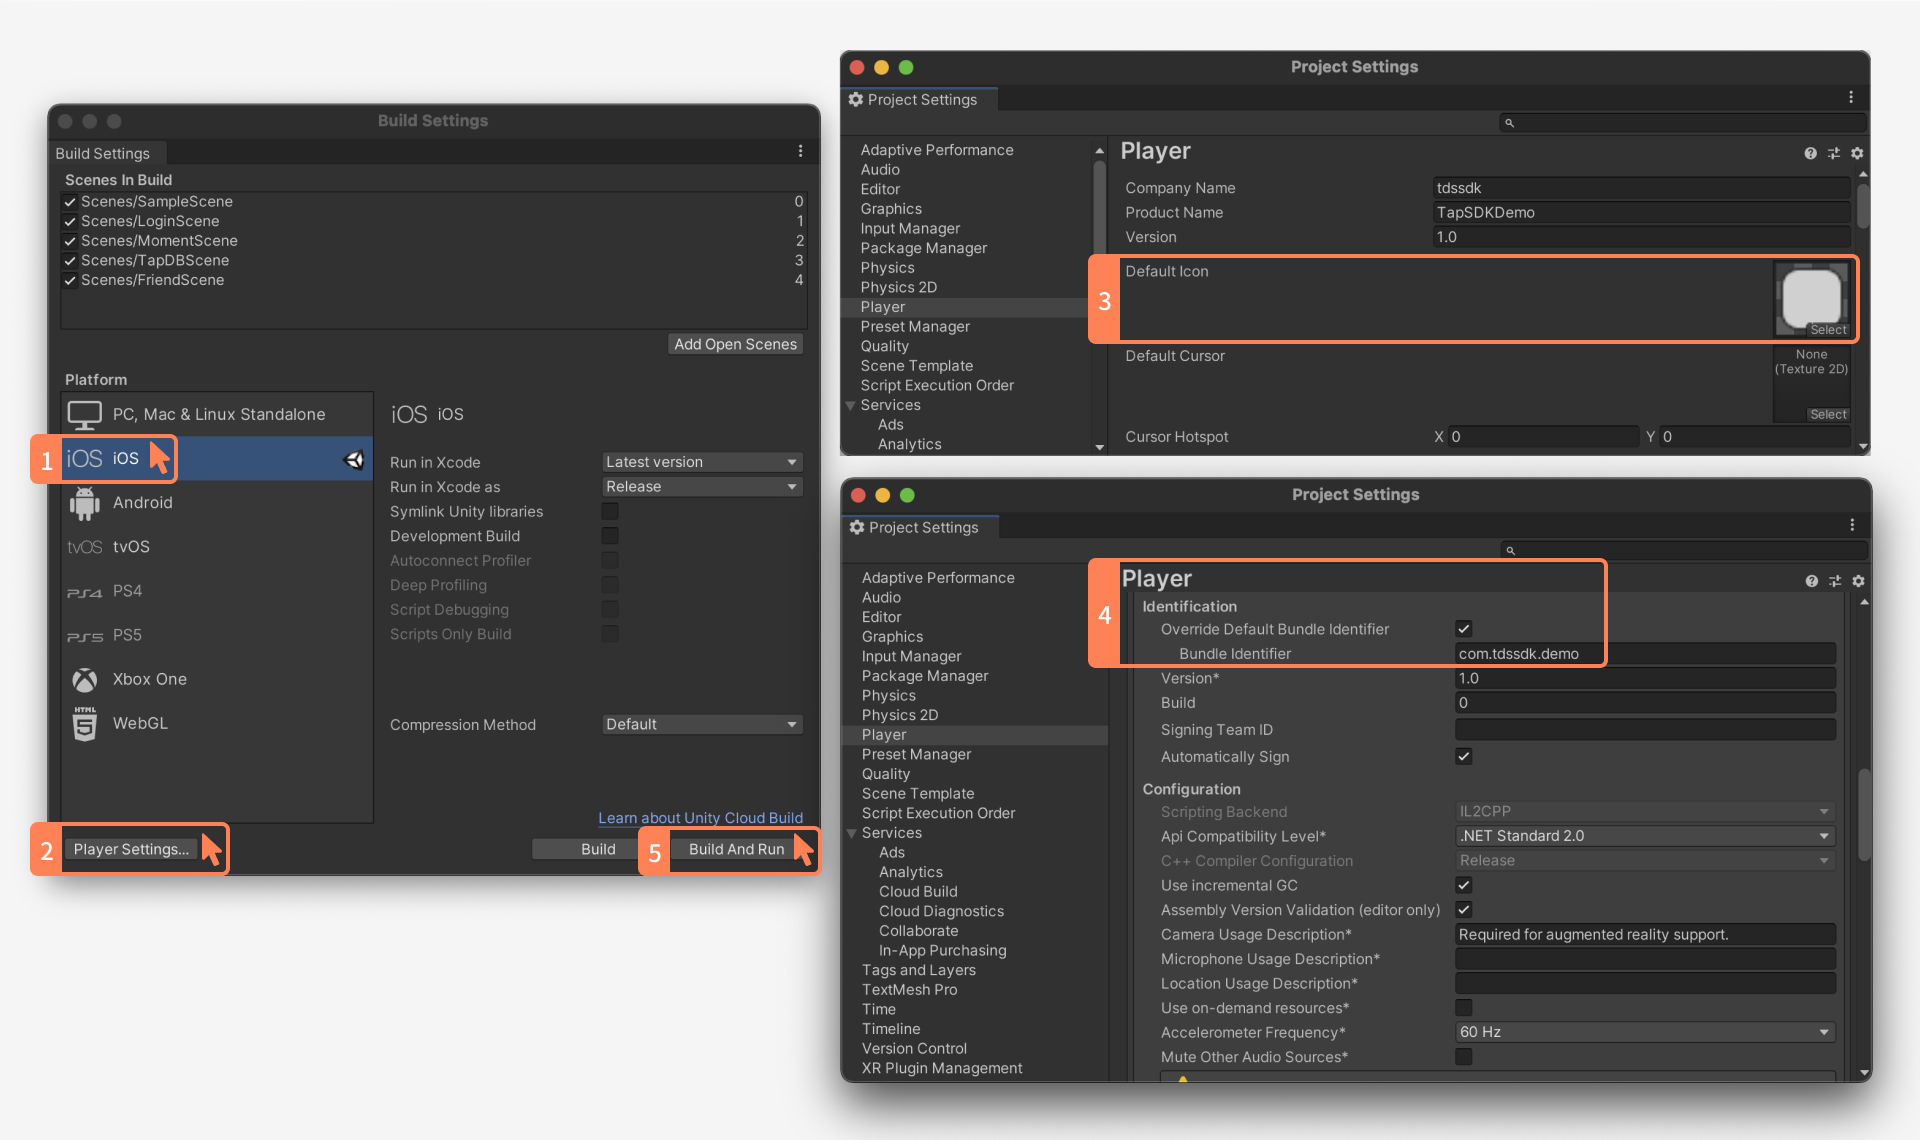
Export Xcode Project
You need to configure the icon and BundleID:
Repackaging
Initialization Failure Due to META-INF/services Merge Error
The implementation of TapSDK's initialization framework relies on auto-service, generating META-INF/services/xxx files (service implementation classes) through auto-service, and then using Java's service loader to load them.
The problem often appears as initialization failure, but the essential reason is that during repackaging, the game developer did not correctly merge the files in the META-INF folder.
Type 1: Excluded META-INF/services/com.taptap.sdk.internal.service.ITapAutoService File During Repackaging
This type of problem is common, where developers often do not process all files under META-INF/services (exclude), leading to SDK initialization failure.
Type 2: Error in Merging META-INF/services/com.taptap.sdk.internal.service.ITapAutoService
This means that the developer realized the need to process the files under META-INF/services, but an error occurred during the merge, leading to SDK initialization failure. This type of problem often arises because the developer adopted the override strategy rather than merge during repackaging, which means that when encountering the same file name META-INF/services/com.taptap.sdk.internal.service.ITapAutoService in multiple AARs, only one was retained, leading to SDK initialization failure.
Incorrect merge, as shown:

Correct merge, as shown:
