Development Guide
Permissions Description
- Unity
- Android Java
- Android Kotlin
- iOS Swift
- iOS Objc
This module depends on the following permissions:
| Permission | Purpose | Timing of Permission Request |
|---|---|---|
| Network Permission | Used for accessing network data | Permission is requested the first time the user uses this feature |
The module will add the following configuration to the application:
<uses-permission android:name="android.permission.INTERNET"/>
Preparing to Integrate the SDK
- Refer to Preparation Work to create an application, enable application configuration;
- Refer to Quick Start to configure the package name and signature certificate;
Obtaining the SDK
- Unity
- Android Java
- Android Kotlin
- iOS Swift
- iOS Objc
External Dependency Integration
The SDK internally uses some third-party libraries. Developers need to ensure that the external dependencies are properly integrated before using the SDK. The specific settings are as follows:
- The SDK uses the
Newtonsoft-jsonlibrary for JSON parsing. If this dependency is already integrated in the current project, no additional handling is needed. Otherwise, add the following dependency toPackages/manifest.json:
"com.unity.nuget.newtonsoft-json":"3.2.1"
- The SDK uses
com.google.external-dependency-managerto manage Android and iOS dependencies. If this dependency is already integrated in the current project, no additional handling is needed. Otherwise, add the following dependency toPackages/manifest.json:
{
   "dependencies": {
      "com.google.external-dependency-manager": "1.2.179"
   },
   "scopedRegistries": [
      {
         "name": "package.openupm.com",
         "url": "https://package.openupm.com",
         "scopes": [
            "com.google.external-dependency-manager"
         ]
      }
  ]
}
Adding SDK Dependencies
The SDK supports integration through Unity Package Manager and local file imports. Developers can choose one of these methods based on their needs, with remote dependencies being recommended.
Remote Dependency
The SDK can be integrated via NPMJS or GitHub. Developers can choose one of these methods.
1. NPMJS Integration
Add the following dependencies in the project's Packages/manifest.json file:
"dependencies":{
  "com.taptap.sdk.core":"4.5.4",
    "com.taptap.sdk.login":"4.5.4",
}
Note that you need to declare scopedRegistries at the same level as dependencies in Packages/manifest.json:
"scopedRegistries":[
  {
    "name": "NPMJS",
    "url": "https://registry.npmjs.org/",
    "scopes": ["com.taptap"]
  }
]
2. GitHub Integration
Add the following dependencies in the project's Packages/manifest.json file:
"dependencies":{
 "com.taptap.sdk.core":"https://github.com/taptap/TapSDKCore-Unity.git#4.5.4",
   "com.taptap.sdk.login":"https://github.com/taptap/TapSDKLogin-Unity.git#4.5.4",
}
In Unity's top menu, select Window > Package Manager to view packages installed in the project.
Local File Import
- Download the corresponding
unitypackagefiles for the modules from the Download Page and import them into the Unity project through Assets > Import Packages > Custom Packages, including:
TapSDK_Core.unitypackageTapTapSDK Core Module, Mandatory。TapSDK_Login.unitypackageTapTapSDK Login Module, Mandatory。
- If the current project has already integrated the
Newtonsoft.Jsondependency, skip this step. Otherwise, download the library file fromNuGet.orgNewtonsoft.Json by clicking "Download package" on the right, change the file extension from.nupkgto.zip, extract the file, and copy theNewtonsoft.Json.dllfile to thePluginsdirectory underAssets. Additionally, to avoid deleting necessary data when exporting to the IL2CPP platform, create alink.xmlfile in theAssetsdirectory (if it already exists, add the following content):
<linker>
  <assembly fullname="System.Core">
    <type fullname="System.Linq.Expressions.Interpreter.LightLambda" preserve="all" />
  </assembly>
</linker>
iOS Configuration
Create a TDS-Info.plist file in the Assets/Plugins/iOS/Resource directory, copy the following code, and replace ClientId within it.
When copying the content below, please remove empty lines and comments to avoid XML parsing errors, such as ApplicationException: expected a key node.
<?xml version="1.0" encoding="UTF-8"?>
<!DOCTYPE plist PUBLIC "-//Apple//DTD PLIST 1.0//EN" "http://www.apple.com/DTDs/PropertyList-1.0.dtd">
<plist version="1.0">
<dict>
    <key>taptap</key>
    <dict>
        <key>client_id</key>
        <string>ClientId</string>
    </dict>
</dict>
</plist>
- Add the repository address to the build.gradle in the root directory of the project:
repositories {
  google()
  mavenCentral()
}
- Add corresponding dependencies to the app module's build.gradle:
dependencies {
  implementation 'com.taptap.sdk:tap-core:4.5.4'
  implementation 'com.taptap.sdk:tap-kit:4.5.4'
  implementation 'com.taptap.sdk:tap-login:4.5.4'
}
If targetSdkVersion < 29, the following configuration is also needed:
- Add
xmlns:tools="http://schemas.android.com/tools"to themanifestnode - Add
tools:remove="android:requestLegacyExternalStorage"to theapplicationnode
Adding Dependencies
iOS provides two integration methods: adding CocoaPods remote dependencies and using local file imports. It is recommended to use the remote dependency method.
Remote Dependencies
- Add dependencies under the corresponding module in the project's Podfile file:
pod 'TapTapLoginSDK', '~> 4.5.4'
-
Execute
pod installto download the corresponding dependency files -
Import resource files such as
TapTapLoginSDK/Frameworks/TapTapLoginResource.bundlefrom the Pods directory of the project into the project
Local File Dependencies
TapTap login depends on the initialization module. When adding dependencies using local files, refer to TapSDK Integration to add the corresponding local file dependencies.
- Download the following files from the Download Page:
TapTapLoginSDK.xcframeworklogin dependency libraryTapTapLoginResource.bundlelogin resource file
- Add the
frameworkstatic library to the project, ensure the Embed method is set to Do Not Embed when adding, and import thebundleresource file
Project Configuration
TapTap client application jump configuration
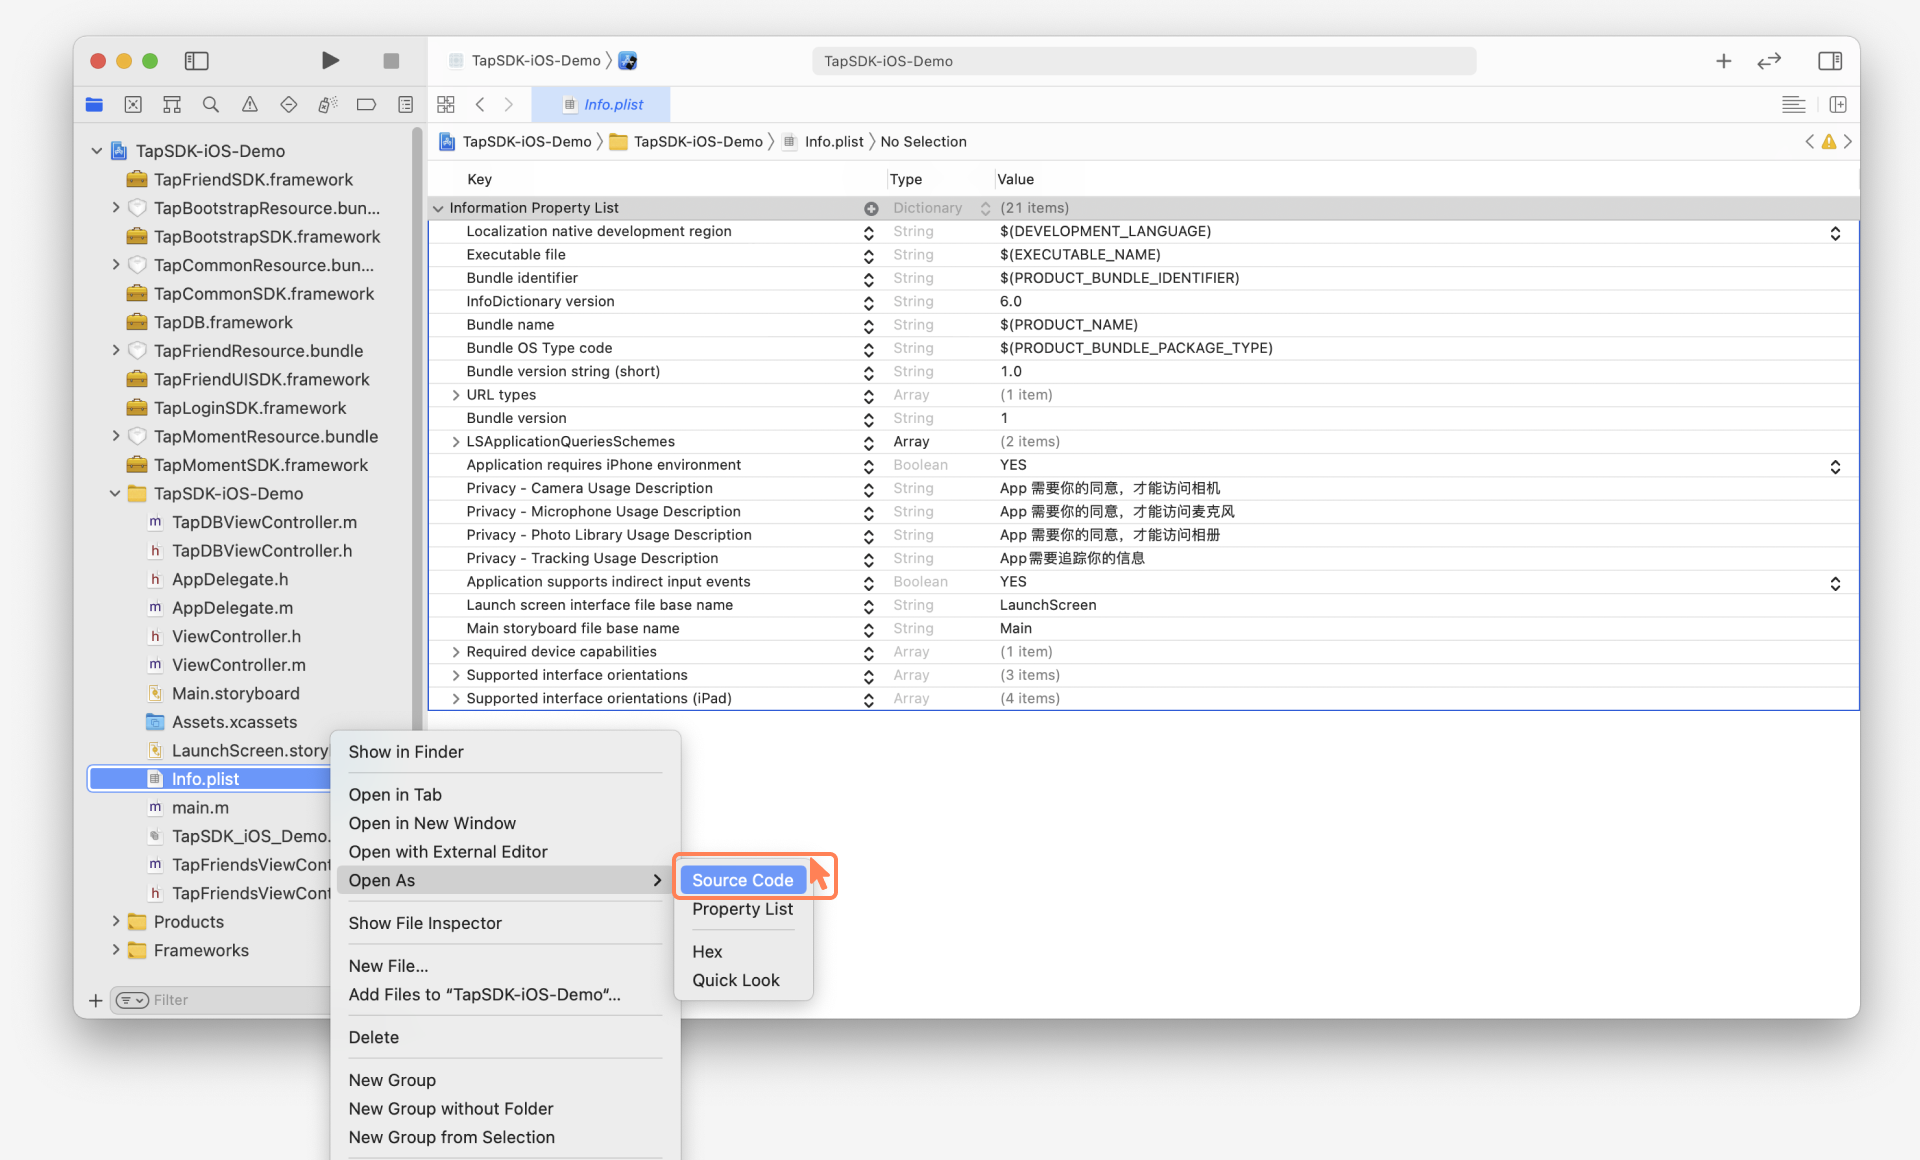
-
Open
info.plistand add the following configuration (please replaceclientIDwith the Client ID you obtained from the console):
<key>CFBundleURLTypes</key>
<array>
    <dict>
        <key>CFBundleTypeRole</key>
        <string>Editor</string>
        <key>CFBundleURLName</key>
        <string>taptap</string>
        <key>CFBundleURLSchemes</key>
        <array>
            <!-- Note here, the brackets need to be removed, the final form is `tt` prefixed to the Client ID, for example: ttFwFdCxxxxxxxQDQwQN -->
            <string>tt[clientID]</string>
        </array>
    </dict>
</array>

<key>LSApplicationQueriesSchemes</key>
<array>
  <string>tapiosdk</string>
  <string>tapsdk</string>
  <string>taptap</string>
</array> -
Configure openUrl
a) If there is a
SceneDelegate.swiftin the project, please delete it first, then add the following code to theAppDelegate.swiftfile:
import TapTapLoginSDK

func application(_ app: UIApplication, open url: URL) -> Bool {
    return TapTapLogin.open(url: url)
}

func application(_ app: UIApplication, open url: URL, options: [UIApplication.OpenURLOptionsKey : Any] = [:]) -> Bool {
    return TapTapLogin.open(url: url)
}

func application(_ application: UIApplication, open url: URL, sourceApplication: String?, annotation: Any) -> Bool {
    return TapTapLogin.open(url: url)
}
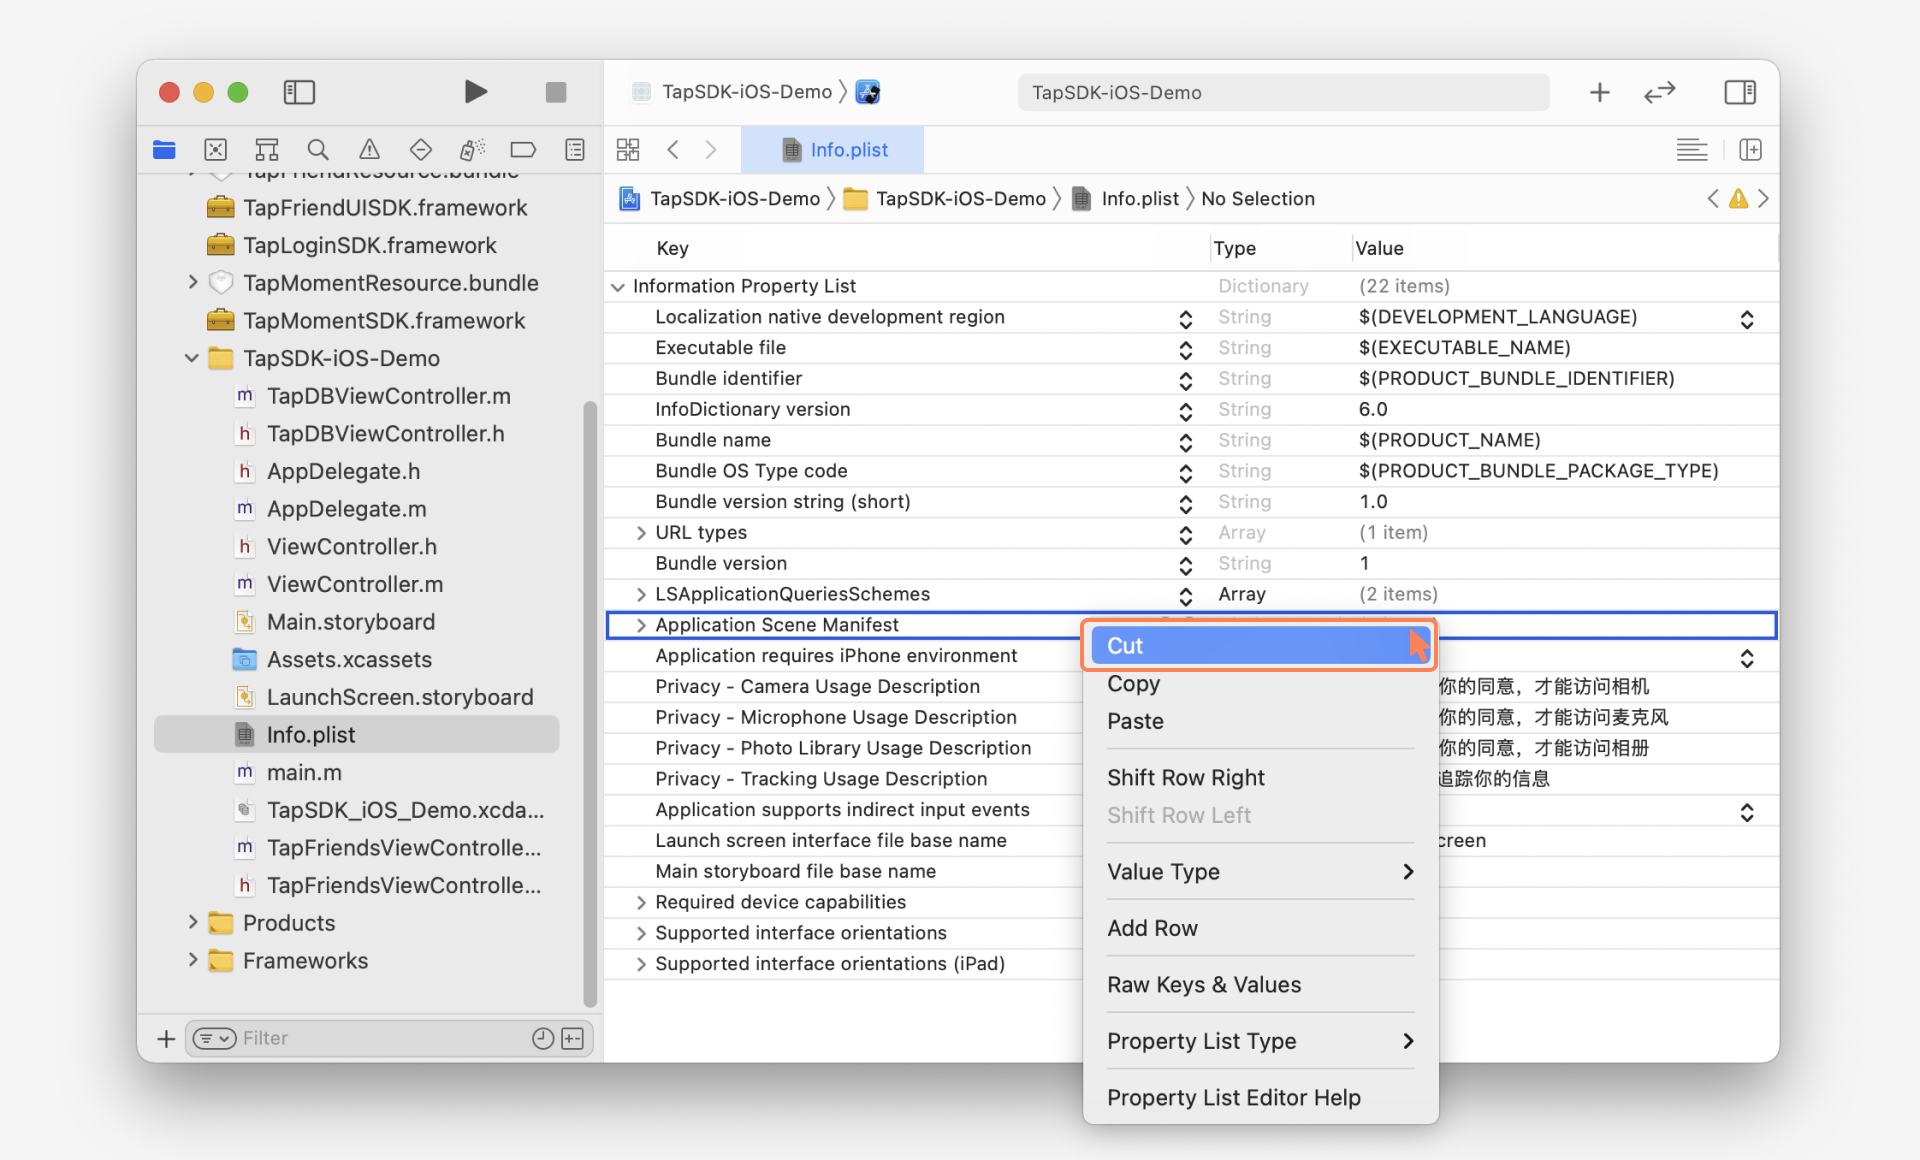
b) Delete the Application Scene Manifest inside info.plist

c) Delete the two lifecycle delegate methods managing Scenedelegate in the AppDelegate.swift file
func application(_ application: UIApplication, configurationForConnecting connectingSceneSession: UISceneSession, options: UIScene.ConnectionOptions) -> UISceneConfiguration {

}

func application(_ application: UIApplication, didDiscardSceneSessions sceneSessions: Set<UISceneSession>) {

}
d) Add UIWindow in AppDelegate.swift
var window: UIWindow?
SDK Initialization
TapTap login module depends on TapTapSDK initialization, please refer to TapSDK Integration for details.
- Unity
- Android Java
- Android Kotlin
- iOS Swift
- iOS Objc
using TapSDK.Core;

// Core configuration, detailed parameters see [TapTapSDK]
TapTapSdkOptions coreOptions = new TapTapSdkOptions();
// TapSDK Initialization
TapTapSDK.Init(coreOptions);
Detailed parameters of TapTapSdkOptions can be found in Getting Started Guide#Quick Start
import com.taptap.sdk.core.TapTapRegion;
import com.taptap.sdk.core.TapTapSdk;
import com.taptap.sdk.core.TapTapSdkOptions;

/* Required Configuration */
// Client ID corresponding to the Developer Center
String clientId = "";
// Client Token corresponding to the Developer Center
String clientToken = "";
// Whether to enable log, it is recommended to enable it during Debug and disable it during Release, default is to disable log
boolean enableLog = BuildConfig.DEBUG;

TapTapSdkOptions tapSdkOptions = new TapTapSdkOptions(
        clientId, // Game Client ID
        clientToken, // Game Client Token
        TapTapRegion.CN // Playable region of the game: [TapTapRegion.CN]=Domestic [TapTapRegion.GLOBAL]=Overseas
);
tapSdkOptions.setEnableLog(enableLog);
// Initialize TapSDK
TapTapSdk.init(context, tapSdkOptions);
Detailed parameters of TapTapSdkOptions can be found in Getting Started Guide#Quick Start
import com.taptap.sdk.core.TapTapSdk
import com.taptap.sdk.core.TapTapSdkOptions
import com.taptap.sdk.core.TapTapRegion
import com.taptap.sdk.core.TapTapLanguage

TapTapSdk.init(
  context = context,
  sdkOptions = TapTapSdkOptions(
      clientId = clientId,
      clientToken = clientToken,
      region = TapTapRegion.CN,
      preferredLanguage = TapTapLanguage.ZH_HANS,
      enableLog = false
  )
)
import TapTapCoreSDK

// Core configuration items
let options = TapTapSdkOptions()
options.clientId = "your_client_id" // Required, Client ID corresponding to the Developer Center
options.clientToken = "your_client_token" // Required, Client Token corresponding to the Developer Center
options.region = .CN // .CN: Mainland China, .overseas: Other countries or regions
options.enableLog = enableLog.selectedSegmentIndex == 0 // Whether to enable log, it is recommended to enable it during Debug and disable it during Release, default is to disable log
options.preferredLanguage = TapLanguageType.auto // Language setting, default is to follow the system, when the system language is not supported, it defaults to Chinese domestically and English overseas

// Initialize SDK
TapTapSDK.initWith(options)
Login
When the user starts the game, you can first check the user's login status. If the player is already logged in, do not display the login button and allow the player to enter the game directly.
- Unity
- Android Java
- Android Kotlin
- iOS Swift
- iOS Objc
using TapSDK.Login;
using System.Threading.Tasks;

try
{
    // Define authorization scopes
    List<string> scopes = new List<string>
    {
        TapTapLogin.TAP_LOGIN_SCOPE_PUBLIC_PROFILE
    };
    // Start Login & Get UserInfo
    var userInfo = await TapTapLogin.Instance.LoginWithScopes(scopes.ToArray());
    Debug.Log($"Login successful,current userID:{userInfo.unionId}");
}
catch (TaskCanceledException)
{
    Debug.Log("User canceled login");
}
catch (Exception exception)
{
    Debug.Log($"Login failed:{exception}");
}
import com.taptap.sdk.kit.internal.callback.TapTapCallback;
import com.taptap.sdk.kit.internal.exception.TapTapException;
import com.taptap.sdk.login.Scopes;
import com.taptap.sdk.login.TapTapAccount;
import com.taptap.sdk.login.TapTapLogin;
import androidx.annotation.NonNull;

// Define authorization scopes
String[] scopes = new String[]{Scopes.SCOPE_PUBLIC_PROFILE, Scopes.SCOPE_BASIC_INFO};

TapTapLogin.loginWithScopes(activity, scopes, new TapTapCallback<TapTapAccount>() {
    @Override
    public void onSuccess(TapTapAccount tapTapAccount) {
        // Login successful
    }

    @Override
    public void onFail(@NonNull TapTapException exception) {
        // Login failed
    }

    @Override
    public void onCancel() {
        // Login canceled
    }
});
import com.taptap.sdk.login.TapTapLogin
import com.taptap.sdk.kit.internal.callback.TapTapCallback
import com.taptap.sdk.login.TapTapAccount
import com.taptap.sdk.login.Scopes

val scopes = mutableSetOf<String>()
scopes.add(Scopes.SCOPE_PUBLIC_PROFILE)

TapTapLogin.loginWithScopes(
    activity,
    scopes.toTypedArray(),
    object : TapTapCallback<TapTapAccount> {

        override fun onSuccess(result: TapTapAccount) {
            // Success
        }

        override fun onCancel() {
            // Canceled
        }

        override fun onFail(exception: TapTapException) {
           // Failed
        }
    }
)
import TapTapLoginSDK

// Define authorization scopes
var scopes: [Scope] = [Scope.publicProfile]

// Initiate Tap login
TapTapLogin.loginWithScopes(with: scopes) {[weak self] account, error, isCancel in
    guard let self else { return }
    if isCancel {
        // Login canceled
    } else if let error = error {
    	 // Login failed
        NSLog("Tap login failed: \(error.localizedDescription)")
    } else if let account = account {
    	 // Login successful

    	 // Login token
    	 let token = account.accessToken
    	 // User information
    	 let userInfo = account.userInfo
    }
}
Different Authorization Scopes
The TapTap authorization login interface supports selecting different authorization scopes and supports any combination, but must include either public_profile or basic_info, otherwise openid and unionid cannot be obtained. The TapTap authorization login interface can pass an array of String types as parameters, and developers can add different permissions as elements of the array according to their business needs.
| Scope | Description |
|---|---|
public_profile | Obtain openid, unionid, user nickname, user avatar |
user_friends | Obtain permission to access TapTap friend-related data |
basic_info | Obtain openid and unionid |
email | Obtain email and emailVerified data |
Obtaining User Information
After TapTap user login is successful, developers can obtain detailed information about the TapTap authorization result as follows:
The Profile class obtained here varies according to the authorization scopes requested by the game.
It may contain the following information:
| Parameter | Description |
|---|---|
name | The player's nickname on the TapTap platform |
avatar | The player's avatar URL on the TapTap platform |
openid | A unique user identifier generated through user information and game information, each player's openid in each game is different |
unionid | A unique user identifier generated through user information and vendor information, unionid is the same for a player in all games under the same vendor, different under different vendors |
email | The email used by the user to register on the TapTap platform |
emailVerified | Whether the email used by the user to register on the TapTap platform has been verified |
openid and unionid are encoded using standard Base64 (with Padding) and contain characters A-Za-z0-9+/=. The maximum length of openid and unionid is 50 characters.
Since unionid is strongly related to the vendor of the game, unionid is suitable for scenarios such as: the vendor uses a test server for paid deletion tests, and the official server needs to provide benefits to old players who participated in the tests before. This is because the same player has an unchanged unionid in all games under the same vendor.
A user's unionid will change after a game is transferred to another vendor. If a game uses unionid, TDS technical support will confirm the relevant data processing plan with the game developer through a ticket before the transfer to ensure that user data is not confused before and after the transfer.
Check Login Status and User Information
The login status and user information are stored in local cache, re-logging will reset it, and logging out will clear it.
- Unity
- Android Java
- Android Kotlin
- iOS Swift
- iOS Objc
using TapSDK.Login;

try {
    TapTapAccount account = await TapTapLogin.Instance.GetCurrentTapAccount();
    if (account == null) {
        // User not logged in
    } else {
        // User logged in
    }
} catch (Exception e) {
    Debug.Log($"Failed to obtain user information {e.Message}");
}
import com.taptap.sdk.login.AccessToken;
import com.taptap.sdk.login.TapTapAccount;
import com.taptap.sdk.login.TapTapLogin;

TapTapAccount currentTapAccount = TapTapLogin.getCurrentTapAccount();

if (currentTapAccount != null) {
    // Logged in
    AccessToken accessToken = currentTapAccount.getAccessToken();
} else {
    // Not logged in
}
import com.taptap.sdk.login.TapTapLogin
import com.taptap.sdk.login.TapTapAccount

// Get user information
when (TapTapLogin.getCurrentTapAccount() == null) {
    true -> {
        // Not logged in
    }

    else -> {
        // Logged in
    }
}
import TapTapLoginSDK

if let account = TapTapLogin.getCurrentTapAccount() {
    let token = account.accessToken
    let profile = account.userInfo
    if let token, let profile {
			// User logged in
       } else {
         NSLog("Tap account not logged in")
    }
} else {
    NSLog("Tap account not logged in")
}
Logout
- Unity
- Android Java
- Android Kotlin
- iOS Swift
- iOS Objc
using TapSDK.Login;

TapTapLogin.Instance.Logout();
import com.taptap.sdk.login.TapTapLogin;

TapTapLogin.logout();
import com.taptap.sdk.login.TapTapLogin

TapTapLogin.logout()
import TapTapLoginSDK

TapTapLogin.logout()
Unity PC Login Configuration
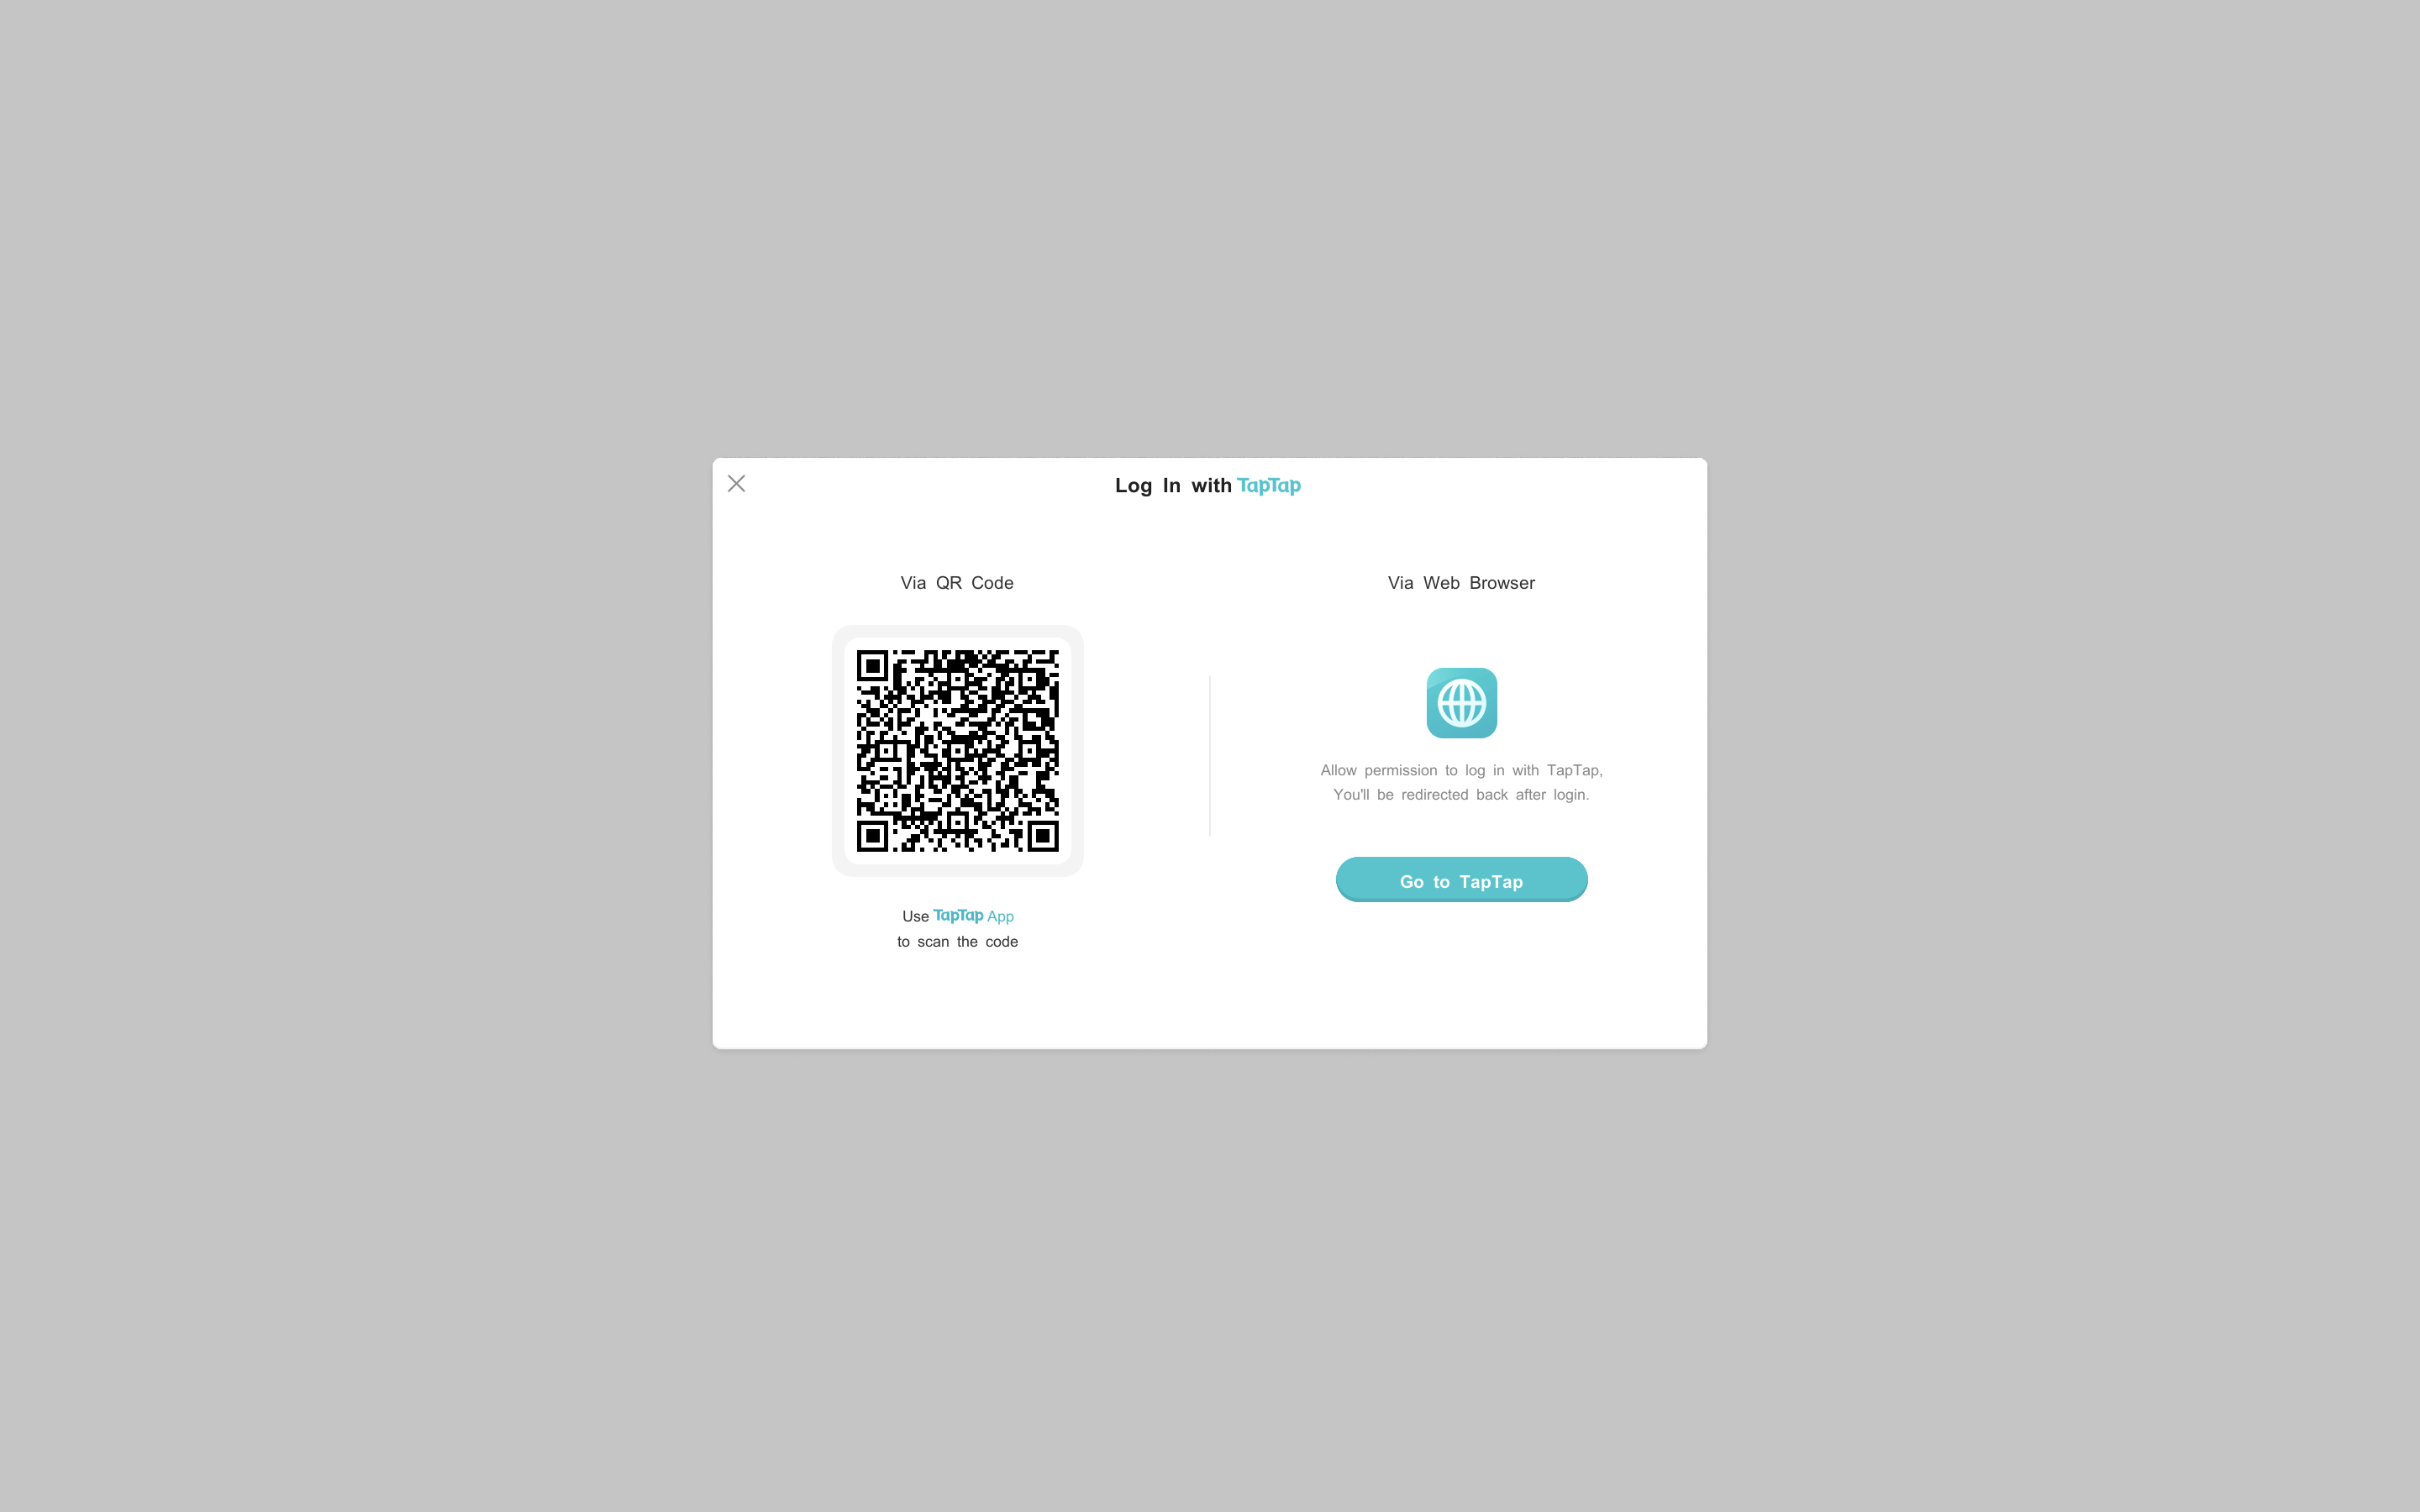
The SDK supports QR code login by default, extra configuration is needed for redirecting to browser login, refer to the following sections for details.

Windows Platform
To use the browser login feature on Windows, the registry needs to be configured accordingly:
Windows Registry Editor Version 5.00

[HKEY_CLASSES_ROOT\open-taptap-{client_id}]
@="{Game Name}"
"URL Protocol"="{Program.exe installation path}}"

[HKEY_CLASSES_ROOT\open-taptap-{client_id}]
@="{Game Name}"

[HKEY_CLASSES_ROOT\open-taptap-{client_id}]

[HKEY_CLASSES_ROOT\open-taptap-{client_id}\Shell\Open]

[HKEY_CLASSES_ROOT\open-taptap-{client_id}\Shell\Open\Command]
@="\"{Program.exe installation path}\" \"%1\""
macOS Platform
On macOS, the SDK will automatically configure CFBundleURLTypes.
Please confirm the configuration is correct by following these steps:
- In Unity, open
BuildSetting, selectPC, Mac & Linux StandalonePlatform, and setTarget PlatformtomacOS. - Check
Create XCode Projectand choose to output theXCodeproject for compilation. - Open the output
XCode Project, selectTarget, clickInfo, expandURL Types, and check if the followingURL Schemeis automatically added:TapWeb : open-taptap-{clientId}. If not, add it manually:
<key>CFBundleURLTypes</key>
<array>
    <dict>
        <key>CFBundleURLName</key>
        <string>TapWeb</string>
        <key>CFBundleURLSchemes</key>
        <array>
          <string>open-taptap-{client_id}</string>
        </array>
    </dict>
</array>