APNs Configuration Guide
APNs is Apple’s push notification service. It allows app developers to send push notifications to apps installed on Apple devices.
This article explains how to add APNs support to apps installed on Apple devices and what configurations you need to set up on the Developer Center.
Enable Push Notifications
Follow these two steps to enable push notifications for your app:
- Enable the push notifications permission for your project.
- Enable push notifications for the corresponding App ID on Apple Developer.
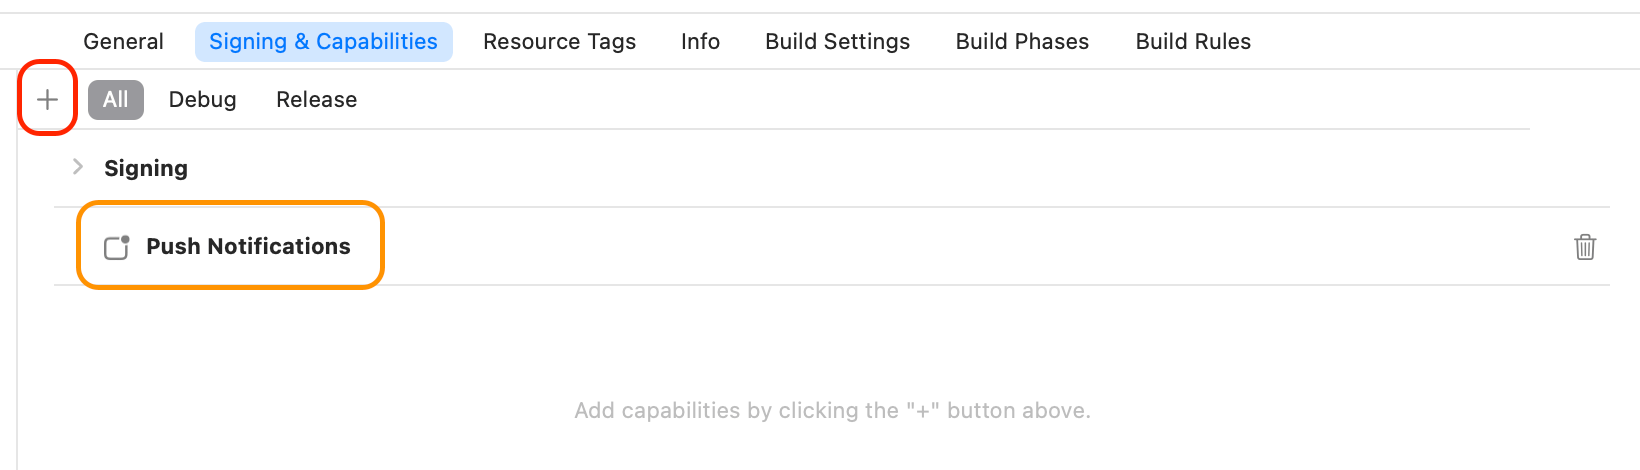
Enable the Push Notifications Permission
To add the required permission to the app, enable push notifications for the app in Xcode.
To do this, open the Xcode project, go to Project > Target > Capabilities, click the plus sign, select Push Notifications, and add it. The result should look like the screenshot below:
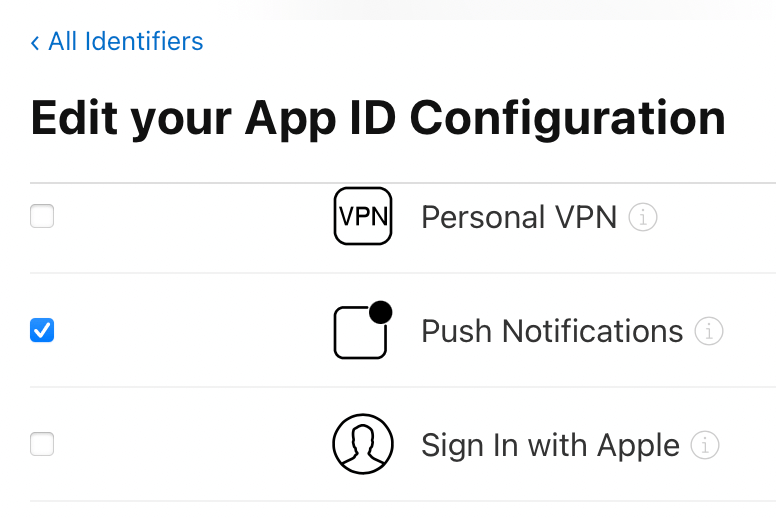
Enable Push Notifications for the App ID
To enable push notifications for an App ID, go to Apple Developers, go to Certificates, Identifiers & Profiles, click Identifiers on the sidebar, and click the corresponding App ID (which is the Bundle Identifier in the Xcode project). Now select the Push Notifications checkbox and click “Save” to save the change. The result should look like the screenshot below:
Select a Push Method
Apple offers two ways to send push notifications, each with its own advantages and disadvantages. Both are supported by our Push Notification service, and you can choose one based on your needs.
- Token-Based Push Notification (Recommended).
- Technically, this is faster than certificate-based push notification.
- The same key can be used by multiple applications.
- The same key can be used to send push notifications to multiple applications under an Apple Developer account.
- The same key can be used to send push notifications to test apps and production apps.
- A key never expires, so you don’t have to regenerate it like you do with certificates.
- Certificate-Based Push Notification.
- A certificate is associated with an Apple Developer App ID and can only be used to send push notifications to the associated app.
- APNs comes with a development environment and a production environment. You may need to set up different certificates for apps in different environments.
- A certificate has an expiration date, and you will need to regenerate and reconfigure certificates periodically.
In general, token-based push notification is easier to set up and provides better usability and functionality than certificate-based push notification. We recommend that you use token-based push notification.
Note that you cannot use both methods simultaneously, and token-based push notification takes precedence over certificate-based push notification. Once you set up token-based push notifications, all push notifications sent from your app will use this method.
Token-Based Push Notification (Recommended)
To enable token-based push notification, first generate and download an Auth Key from Apple Developer, then upload it to the Developer Center and set up the appropriate configurations. Once complete, you will be able to send push notifications from your app.
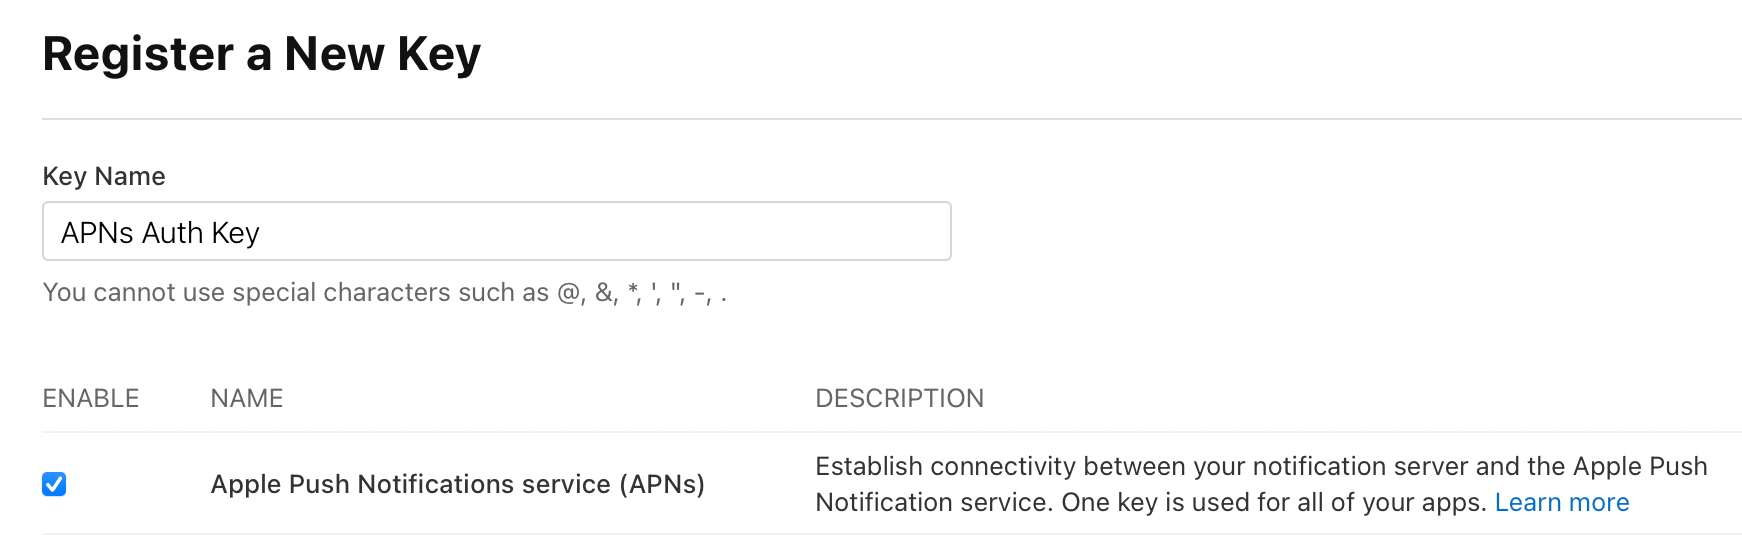
Generate a Key
To generate a key, sign in to Apple Developer, navigate to Certificates, Identifiers & Profiles, click Keys in the sidebar, and then click the plus sign (+). Enter a unique name for the key and select Apple Push Notifications service (APNs):
Note that if you don’t see Keys in the sidebar, your account may not have the necessary permissions.
Proceed to the next page and review the key details. If everything looks good, generate the key and download it. You will get a text file with the extension .p8.
Be sure to keep this file (with the extension
.p8) in a safe place. You won’t be able to download it again because the key is not stored in your Apple Developer account. If the download button is disabled, it means you have already downloaded the key.
Configure the Key
After downloading the key (as a .p8 file), you will need to upload it to the Developer Center and complete some configurations:
- Go to Developer Center > Your game > Game Services > Cloud Services > Push Notification > Settings > iOS Token Authentications and click on New Token Authentication.
- Enter
Team ID,Key ID, andTopicsin the pop-up window and upload the key file (the.p8file) here.Team IDis the ID of the team to which the Apple Developer account belongs. You can find it under Membership in Apple Developer.Key IDis the ID of the key (the.p8file), which can be found by going to Certificates, Identifiers & Profiles > Keys in Apple Developer and clicking on the corresponding key.Topicsis the IDs of your apps (the Bundle Identifiers in Xcode projects). You can specify multiple topics by separating them with commas, as long as they belong to the same Team ID.
- Click Add to finish uploading and setting up the key.
Once you have completed the above steps, you can send a test notification by going to Developer Center > Your game > Game Services > Cloud Services > Push Notification > Send notifications.
Certificate-Based Push Notification
To enable certificate-based push notification, a certificate must be generated for each app on Apple Developer. Each app can have sandbox certificates and sandbox & production certificates. Once you have obtained the certificates from Apple Developer, upload them to the Developer Center and you will be able to send push notifications using the certificates.
Generate Certificates
To generate certificates, sign in to Apple Developer, navigate to Certificates, Identifiers & Profiles, click Certificates in the sidebar, and then click the plus sign (+). Follow the steps below:
-
Select a certificate type. The most common is
Apple Push Notification service SSL. For this certificate type, you can choose betweenSandboxandSandbox & Production.Sandboxcertificates can only be used in development environments, whileSandbox & Productioncan be used in both development and production environments. You can refer to the descriptions under each option for more information, as shown in the screenshot below: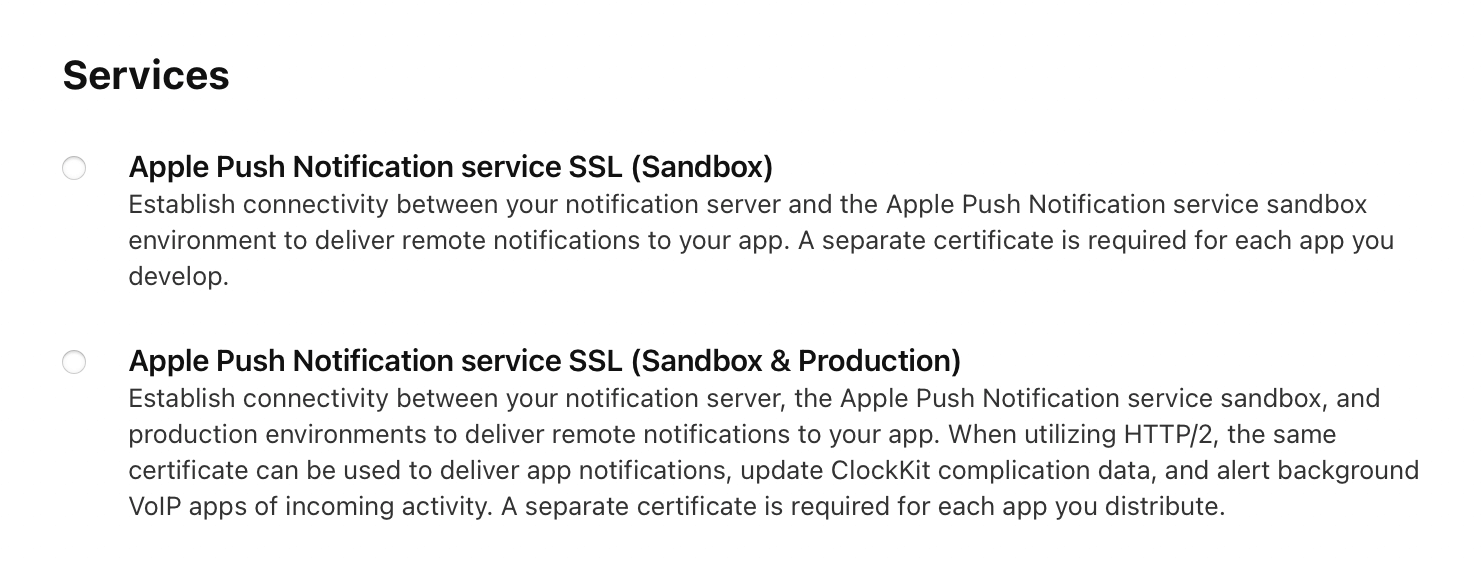
-
After selecting a certificate type, proceed to the next step and select an App ID (the Bundle Identifier in the Xcode project), then proceed to the next step. You will be prompted to upload a CSR file.
-
Generate a CSR (Certificate Signing Request) file on your Mac by following these steps:
-
Open
Keychain Accessin/Applications/Utilities. -
Select Keychain Access > Certificate Assistant > Request a Certificate From a Certificate Authority….
-
In the Certificate Assistant window, enter an email address in
User Email Addressand a name for the key inCommon Name(e.g., Gita Kumar Dev Key). -
Leave
CA Email Addressblank. -
Select
Saved to diskand continue.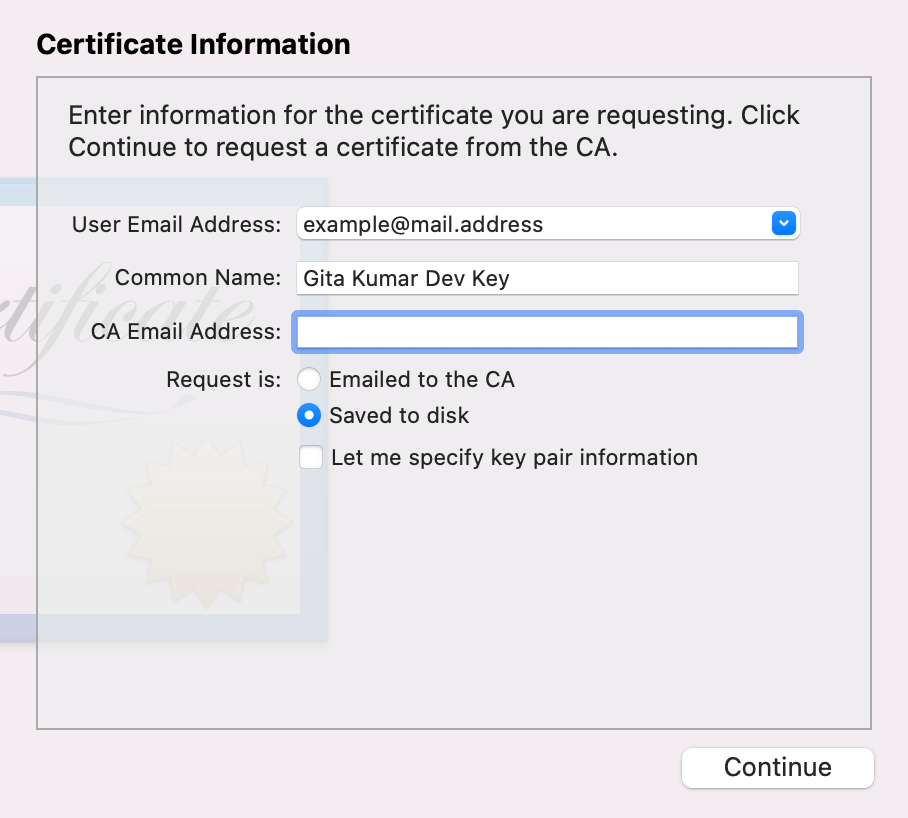
-
-
Upload your CSR file (the
.certSigningRequestfile you saved from the last step) and continue. Download the generated certificate.
Set up Certificates
After you generate a certificate, you’ll need to upload the downloaded certificate and your private key to the Developer Center. Follow the instructions below:
-
On the Mac you used to generate the CSR, double-click the downloaded certificate. macOS will import the certificate into
Keychainand group it with the key of the CSR you generated earlier, as shown in the screenshot below: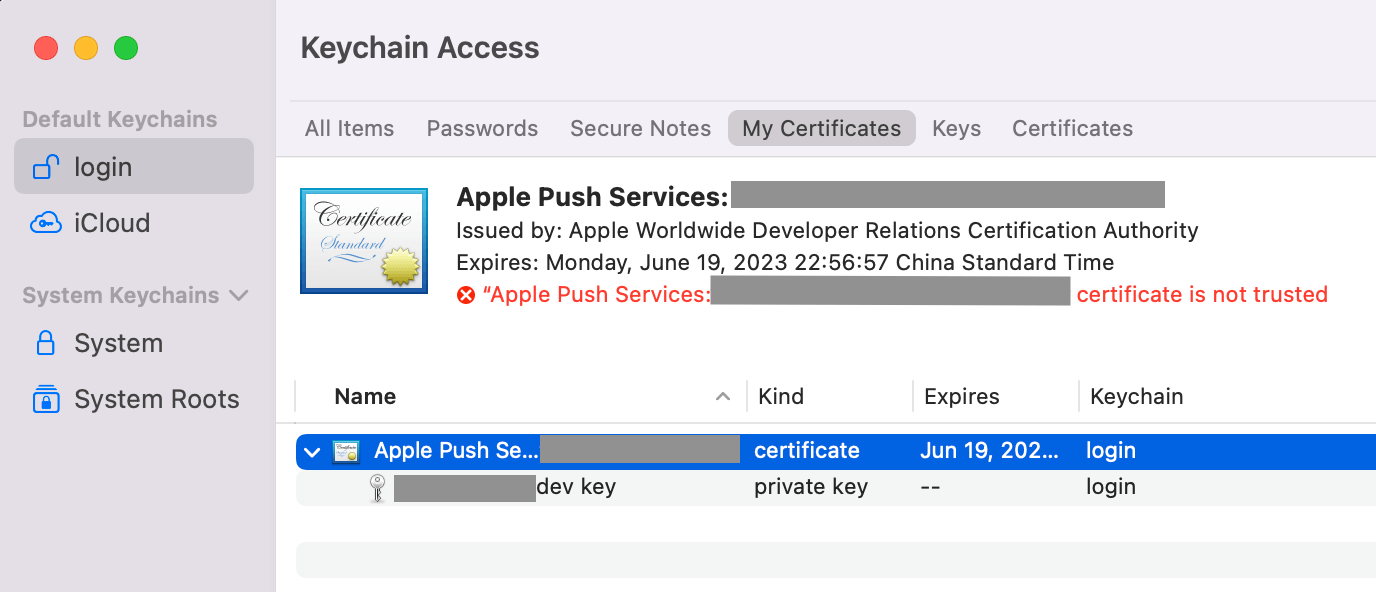
-
Go to Keychain Access > login > My Certificates and right-click the imported certificate (not the key), select Export, and save the certificate to disk as a
.p12file. A popup will appear asking for a password. Leave the two fields blank so that you don’t give the file a password. Now click OK. You may see another popup asking for the macOS login password. Enter the password and click Allow. -
Go to Developer Center > Your game > Game Services > Cloud Services > Push Notification > Settings > iOS push notification certificates and upload the appropriate certificate (the
.p12file exported in the last step).- If the certificate type is
Sandbox, the certificate can only be uploaded to the development environment; if it isSandbox & Production, the certificate can be uploaded to either the development or production environment.
- If the certificate type is
Once you have completed the above steps, you can send a test notification by going to Developer Center > Your game > Game Services > Cloud Services > Push Notification > Send notifications.
Fail to Upload a Certificate
If you are unable to upload a certificate, it is usually because there is a problem with the certificate. Here are some common reasons:
-
The certificate is not a push notification certificate. You can see this from the Common Name of the certificate, which can be viewed by double-clicking the certificate in
Keychain Access. The Common Name of a push notification certificate contains eitherPush ServiceorPass Type ID, as shown in the screenshot below: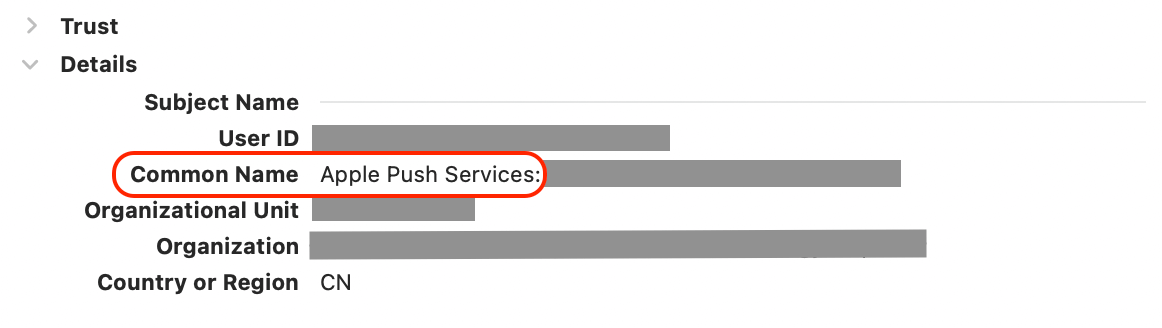
The Developer Center checks to see if the Common Name of the certificate contains any of the following prefixes:
Apple Push ServicesApple Sandbox Push ServicesApple Development IOS Push ServicesApple Production IOS Push ServicesPass Type ID
Apple may change the Common Name prefix of push notification certificates in the future. When this happens, we will update the list of prefixes we use to verify certificates.
-
The certificate is being exported in the wrong format. Currently, the Developer Center only accepts certificates in
.p12format. Please be sure to select this format when exporting the certificate.
Certificate Expired
If you try to send a push notification with an expired certificate, you will receive the error The iOS certificate file is expired or disabled..
Each time you submit a request to send push notifications, our server checks whether the certificate of the environment specified by the prod parameter has expired (if prod is not specified, the certificate of the production environment is checked). If the certificate is expired and the queried target devices may include iOS devices, the push notification request will be rejected.
One solution is to replace the expired certificate with a new one. Another solution is to use the deviceType field in the query to specify that you want to send push notifications to non-iOS devices. See Push Notification REST API Guide for more information.